
Creating and managing labels
The label overview
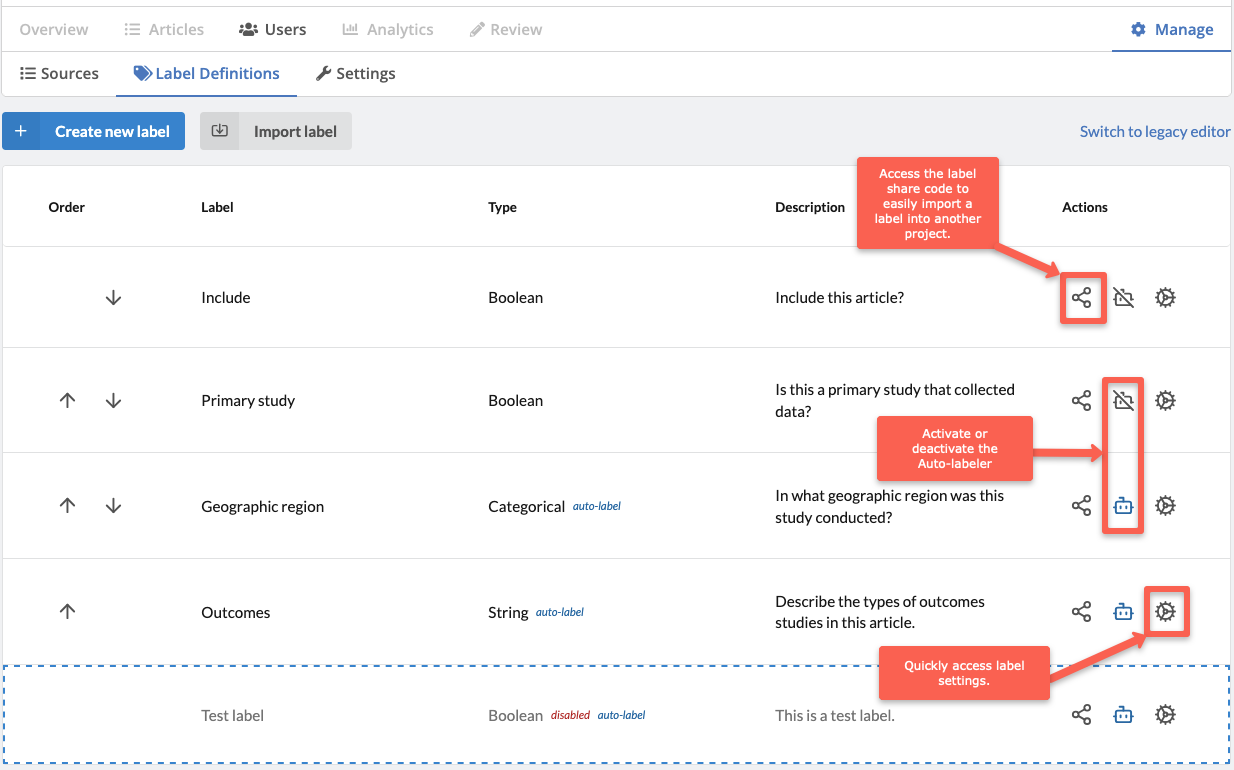
Clicking on the Label Definitions tab will take you to the label overview. This table provides snapshot of your labels, their type and description (i.e. label question) and their current visibility status. From this view, you can also share labels and turn labels on and off for the Auto-labeler.
Creating a new label
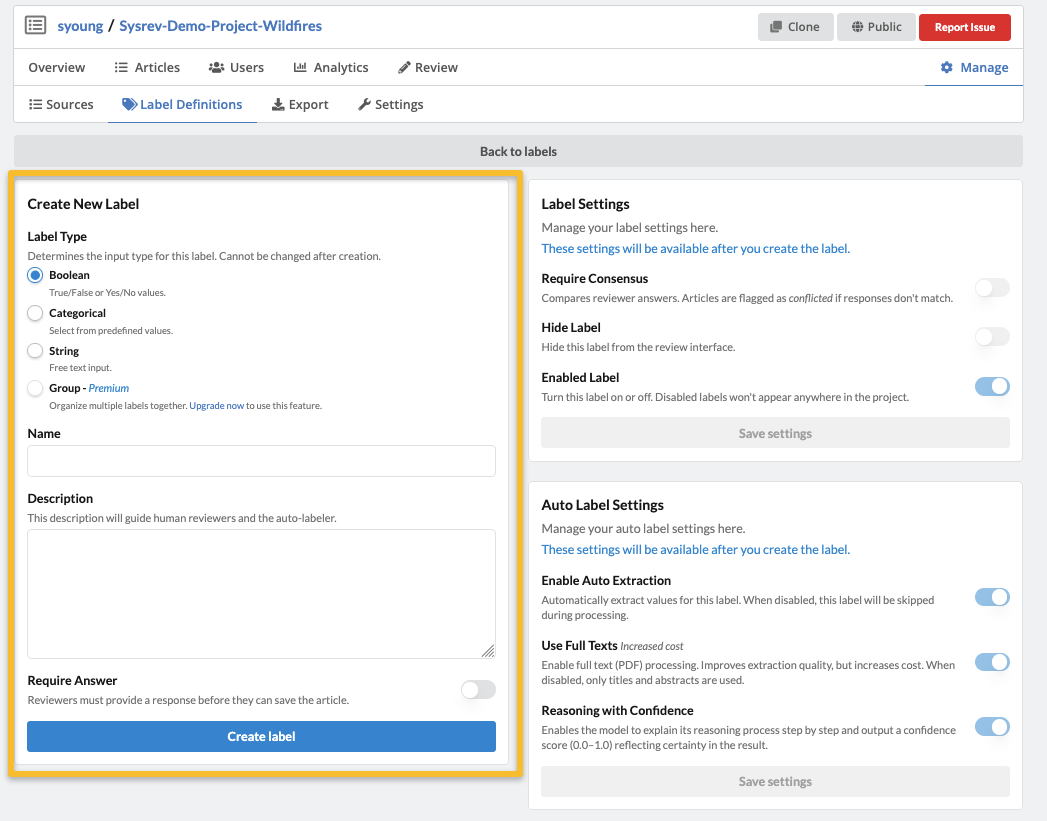
To create a new label, go to Manage -> Label Definitions and click Create new label (or click Import label to use an existing label from another project). This will take you to the Create new Label view. Choose which type of label you would like to create, give it a simple name (which will appear to reviewers in the Review tab) and a definition. This definition will be visible to reviewers by hovering over the question mark icons in the left hand label panel on the Review page. Importantly, this definition also serves as the generative AI prompt when using the Auto-labeler. You can also choose whether or not a label answer will be required or optional during review by toggling ON or OFF Require Answer. When ready, click the Create label button.
About the default Include label
Every Sysrev project has a default Boolean label called "Include". The answers to this label are what populate the Review Status and the Member Activity visualizations with Include/Exclude data on the Overview page. While this label can be hidden, it cannot be disabled. You can also change the label name and add a definition. However, changing the label name will not change the Overview page visualizations--they will still read "Include/Exclude" and provide data for the default label.
Label settings
Once you have created the label, you will have access to the Label Settings and Auto-label Settings.
Label settings include the following options:
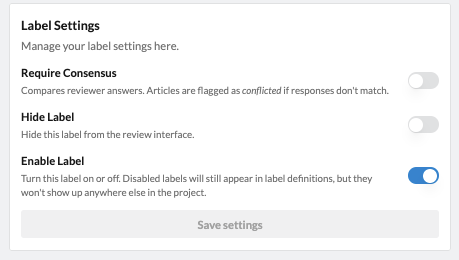
- Require consensus: Toggling this ON will compare reviewer answers such that articles are flagged as conflicted if responses don't match.
- Hide label: Toggling this ON hides the label from the reviewer's view. See more about hidden labels below.
- Enable label: Toggling this OFF disables the label. See more about disabling labels below.
Auto-label setting include the following options:
- Enable Auto Extraction: Toggling this ON will set the Auto-labeler to run on this label.
- Use Full Texts: Toggling this OFF will cause the Auto-labeler only look at the metadata (title and abstract) and not any attached PDFs. Toggling it ON will include full texts in the Auto-labeler's run.
- Reasoning with Confidence: Toggling this ON enables the built-in chain-of thought reasoning questions that can be added to the prompt.
For more about using the Auto-labeler, visit the How to use the Auto-labeler page.
Types of labels
The main types of labels in Sysrev are Boolean, Categorical and String. There are also more complex Group Labels available with Premium and Enterprise accounts, covered on our Group Labels page.
Each label has a number of different settings including:
- whether an answer is required for review or if the label can be skipped,
- whether reviewer consensus is required (i.e. if differing answers between reviewers should be flagged as conflicts),
- whether the label will be visible to or hidden from reviewers
There are also settings related to the Auto-labeler, which are covered in the Auto-labeling section of this guide.
NOTE: Label questions can be edited at anytime. However, for categorical labels, categories that have been used in prior labeling in the project cannot be edited or deleted. That said, new categories can be added at any time.
Boolean labels
Boolean labels are for labels that would require a yes or no answer. By default, every Sysrev project has a Boolean Include label. This can be used to decide if articles should be included or excluded from your review.
Categorical labels
Categorical labels can have one or more of a limited number of possible values. Reviewers can choose from a list, and
this can be set so reviewers can choose only one or multiple answers. When creating a Categorical label, enter your categories or choices in the Categories box and click the plus button. Before creating the label, you have the option of removing categories.
Note: Once you create the label, you can no longer remove categories but you can add new categories.
You can allow reviewers to choose more than one answer by toggling ON Allow Multiple Selections.
You can set a default value by toggling ON Set Default Label Value and choosing from your list. This is useful when you expect the majority of articles to align with a particular answer, thus saving reviewers time.

String labels
String labels are 'free text' labels.
You can allow reviewers to enter multiple separate strings by by toggling ON Allow Multiple Answers.
You can require a certain string pattern in order to constrain answers to things like numeric or alphanumeric answers, or to constrain the length of answers, or require a certain answer format. The Pattern setting uses regular expressions. In the example shown here, we have a string label using the optional Patterns setting to allow any string up to 100 characters in length.

Requiring consensus for label answers
Requiring label consensus means that when reviewer answers differ for a particular article, that article will be flagged as a conflict. For more about conflicts, consensus and resolving conflicts, see the Resolving conflicting reviewer answers help page.
Hiding and disabling labels
Hiding and disabling labels are two ways of managing the visibility of labels. You can do this in the label settings for a given label as shown to the right. Access label settings by going to Manage -> Label Definitions and clicking on the Setting Gear icon under Actions next to the label you want to edit.
When you toggle ON the Hide Label setting, the label is hidden from the reviewer's view. In other words, when in the Review tab, reviewers will not see this label as an option in the left hand label panel. However, data for hidden labels will still be exported and will be included in dashboard visualizations on the Overview page.
When you toggle OFF the Enable Label setting, you disable the label. This means the label is no longer active and will not be visible anywhere in the project or project data. However, you can always re-enable the label by accessing the label through the label list in the Manage -> Label Definitions tab.